
Not only is Mount Kenya the highest mountain in Kenya, it is the second highest in Africa. What really sets it apart though is its rugged beauty. Centuries of erosion have left it with deep valleys and a jagged rocky top. The valleys are filled with glacial tarns, steep cliffs and unusual vegetation. The vertical wall to the summit seems to be purposely made for climbing. It’s the perfect place for an unforgettable mountain adventure.
Before summiting Mount Kilimanjaro we spent a week on Mount Kenya. There are a few hiking routes on the mountain, but they don’t take you to the summit. The only way to Mount Kenya’s summit is by climbing one of the technical rock climbing routes. Since we had never done a technical rock climb at a high elevation and route finding is known to be difficult on Mt. Kenya, we hired a guiding company for this trip.
Day 1 – Naro Moru Park Gate to Met Station
Distance – 10 km; Elevation Gain – 650 m
We had only arrived in Nairobi from Canada the day before and had not done any exploring. When we got to Naro Moru Park Gate (2,400 m) we could tell that this was going to be a different climbing adventure than our usual. A large group of baboons were hanging out near the park gates letting us know we were definitely not in Canada anymore.

Baboons, Naru Moru Gate, Mount Kenya
The first day of the hike is an easy walk, mostly on a gravel road. It travels through a thick jungle, full of massive trees and interesting plants.
Met Station (3050 m) is a small basic bunkhouse in the jungle where we spent our first night. There’s not much to do so we were glad when a resident troop of Sykes’ monkeys came by to keep us entertained.

Sykes’ monkey, Met Station, Mount Kenya 
Lobelia, Mount Kenya 
Large trees, Mount Kenya
Day 2 – Met Station to Mackinder’s Camp
Distance – 10 km; Elevation Gain – 1150 m
The second day of hiking began by climbing up through the forest. After an hour or so the trees became less dense and we entered a fascinating moorland called Vertical Bog. Conditions on this steep hillside can range from damp to a spongy bog depending on the time of year. We left the trees behind and hiked up the steep, open hill. At times the earth was so wet we had to hop between clumps of tussock grass.

Vertical Bog, Mount Kenya 
Vertical Bog, Mount Kenya 
Vertical Bog, Mount Kenya
There was interesting vegetation in the moorland such as gladioli, heather, lobelia and the odd-looking giant groundsels. As we climbed higher, mist came in making the moorland even more mysterious.

Teleki lobelia, Mount Kenya 
Mackinder’s Gladiolus, Mount Kenya 
Giant groundsel, Mount Kenya 
Giant groundsel, Mount Kenya 
Mackinder’s Gladiolus, Mount Kenya
The trail climbs to a ridge above the long Teleki Valley. From there we had our first view of Mount Kenya far above. The silhouette of its serrated peak is spectacular.
The moorlands continued, as we slowly descended to the floor of the Teleki Valley. Not far from our camp, we spotted a cute rock hyrax. To us it looked like a small marmot. As we got further up the valley more and more of the mountain’s rugged south side came into view. When we arrived at the large hut at Mackinder’s Camp (4,200 m) thick clouds were rolling in over the mountain.

Giant groundsels above Teleki Valley, Mount Kenya 
Mount Kenya above Teleki Valley 
Rock Hyrax, Mount Kenya 
Mount Kenya 
Mount Kenya 
Mackinder’s Hut, Mount Kenya
Day 3 – Mackinder’s Hut – Acclimatization hike to Austrian Hut
Distance – 10 km (approx.); Elevation Gain – 490 m
In the morning we woke to see fresh snowfall on the peaks of Mount Kenya. We were getting nervous that we may not be able to climb as the ice and snow would make it unsafe.

Mount Kenya
When hiking at altitude, its important to not climb too high too fast. As well, to help acclimatize it’s good to hike higher during the day, and sleep at a lower elevation at night. Mackinder’s Hut is over 4,000 m so we would spend two nights to help our bodies get used to the elevation. During the day we hiked with our guide Benson to Austrian Hut for acclimatization and also to get a better look at the mountain.
The path continued to climb up the moorland with amazing views of the mountain on our side. We had better and better views of its rugged beauty the closer we got. Eventually the moorlands ended as we approached a large moraine. Crossing the moraine, we passed the picture-perfect Lewis tarn under the twin peaks of Mount Kenya.

Mount Kenya 
Mount Kenya 
Batian and Nelion are on the left, Mount Kenya
A little further on is Austrian Hut. It has a stunning location on the edge of Lewis Glacier with the steep Nelion Peak towering above. We hiked a little higher to get our first peek at Gorges Valley on the other side of the mountain.

Nelion and Batian Peaks, Mount Kenya 
Austrian Hut and Nelion Peak, Mount Kenya 
Gorges Valley from above Austrian Hut, Mount Kenya
That evening at Mackinder’s Hut we met two other climbers. They had attempted to climb a different peak on Mt. Kenya the day before. Unfortunately, they had to turn back because it was too icy and said they wouldn’t try again. We were still hopeful.
Day 4 Mackinder’s Camp to Austrian Hut to Point Lenana
Distance – 18 km; Elevation Gain – 785 to Lenana
After our acclimatization hike the day before, it was time to move up to Austrian Hut (4,790 m). The hut is used as a base for climbers attempting to climb Nelion. There was more fresh snow on the ground from a snowfall overnight. At this elevation, the glare from the sun reflecting off the snow is very intense. Our guide and porters didn’t have sunglasses. Instead, they cut small slits into pieces of a garbage bag and wore them over their eyes. We had an extra pair of small ski goggles so we lent it to our guide. He was very thankful and the three of them shared the goggles for the few days we were on the snow.

Mount Kenya
There are three main peaks on Mount Kenya. The highest is Batian at 5,199 m. The second, Nelion, is only 11 m shorter at 5,188 m. These two make up the central spire of the mountain. The third peak is Point Lenana at 4,985 m. It is a very popular trekking peak as it is the highest point you can reach on the mountain without climbing. Point Lenana is set away from the central spire. We hoped to be on the summit of all three by the end of our trip.
After a quick stop at Austrian Hut we hiked up to Point Lenana with our guide. The trail is steep as it traverses the edge of Lewis Glacier and then follows a rocky ridge to reach the highest point. The rocks had a skiff of snow on top which hid a layer of ice so we had to be careful with our steps. This new snow didn’t make us feel very good about our upcoming climb.
The tip of Point Lenana is small pile of boulders with just enough room for the three of us. From Point Lenana the views are spectacular. The steep face of Nelion was directly in front. On the other side we had views of the stunning Gorges Valley of Chogoria Route. We would use this route for our descent in a few days’ time.

Point Lenana, Mount Kenya 
Nelion Peak from Point Lenana, Mount Kenya 
Point Lenana, Mount Kenya 
Gorges Valley from Point Lenana, Mount Kenya 
View from Point Lenana, Mount Kenya 
View from Point Lenana, Mount Kenya
Day 5 – Summit day
We woke early, still hopeful that conditions on the mountain had improved. Our climbing guide Kenneth arrived the night before to discuss the route. We planned to climb to the top of Nelion, traverse across the Gates of Mist and climb Batian.
The climb on the SE Face (Standard Route) of Nelion is rated 5.6 (IV+). It’s not difficult by climbing standards, but at 5,000 m elevation it would feel much more difficult. Together with our climbing guide and his assistants we hiked around Lewis Glacier and up the moraine to the base of the cliff. It had stopped snowing and the sky was clear, but the shear rock was covered in snow and ice.
The climb is 20 pitches which is quite a long climb. A pitch is as close to the length of a climbing rope (60 m) as possible. We put on our helmets, harnesses and tied in to the rope. Our guide led us up the first two pitches on Nelion. The climbing was not difficult. There were large hand and foot holds, but everything was icy. Large icicles, snow balls and rocks were falling all around us. We made the difficult but right decision to turn around. The weather forecast for the next few days was to be even worse, so we wouldn’t be able to make another attempt.

Base of the climb, Mount Kenya 
Climbing the first pitch, Mount Kenya
The porters were very cold when we returned to Austrian Hut. We brought our warm sleeping bags, but they only had light blankets. They were very excited to get down to a lower elevation the next day.
Day 6 – Austrian Hut to Chogoria Gate
Distance – 20 km; Elevation Loss – 1,750 m
After a chilly night at the hut we woke to an amazing scene. The sun’s morning rays were bright causing a gorgeous alpenglow on Nelion. The rocky landscape around the hut glowed a stunning red. It looked as if we were on Mars.

Alpenglow on Nelion, Mount Kenya 
Alpenglow near Austrian Hut, Mount Kenya
Once we saw the beautiful Gorges Valley from Point Lenana we were glad that we chose this route for our descent. It’s a gorgeous steep valley with impressive red cliffs and mountain lakes scattered throughout. Giant groundsels and lobelia added to the interesting landscape of this magical valley.
Our porters hiked with us on the way up the mountain. On the way down though that changed. They were cold and anxious to get down to a warmer elevation so they ran ahead. We met up with them at the final hut.
As we got further down, we looked behind us for even better views. Tall waterfalls fell from mountain tarns enclosed in rocky cirques. Soaring high above was our last view of the peaks of Mount Kenya’s rugged top.

Mountain tarns, Chogoria Route, Mount Kenya 
The Temple, Gorges Valley, Mount Kenya 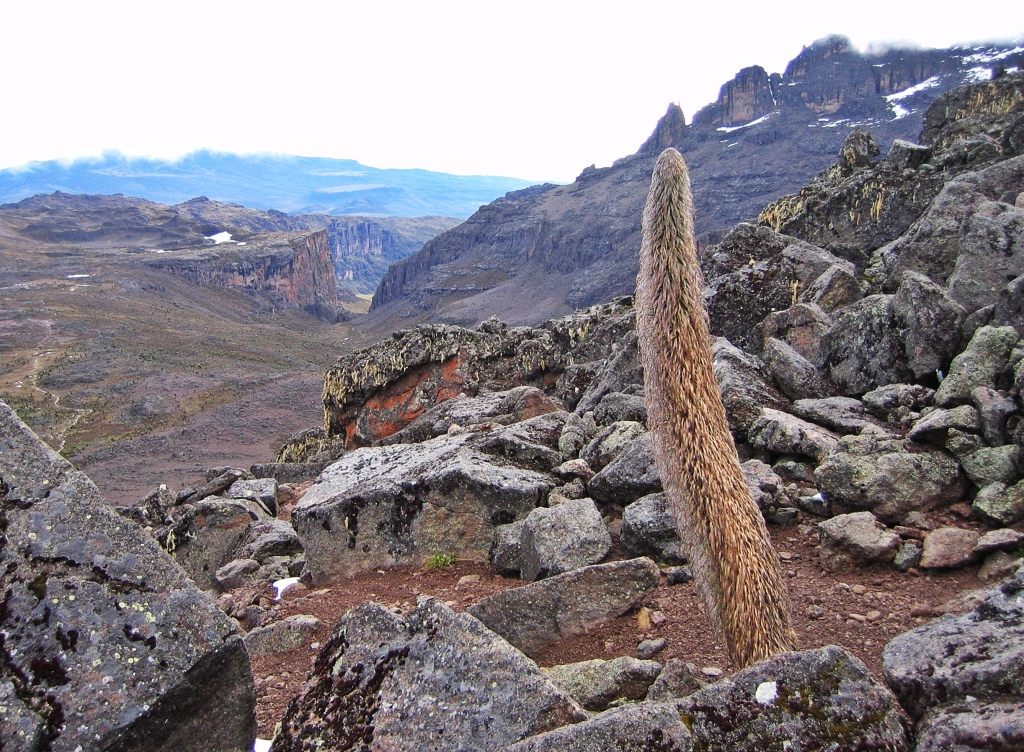
Mackinder’s Lobelia, Gorges Valley, Mount Kenya 
Gorges Valley, Mount Kenya 
Looking toward Mount Kenya in Gorges Valley 
Mount Kenya above Gorges Valley 
Mount Kenya above Gorges Valley
As we got lower, the vegetation began getting thicker and larger. We walked through a forest of rosewood trees, many had Old Man’s Beard lichen hanging from the branches. Just before arriving at our final camp our guide spotted an elephant in the forest. He asked us to be very quiet as we passed by so as not to startle the animal.
We finished at Meru Mount Kenya Lodge where we had a celebratory beer with our guide and porters. We were warned that buffaloes graze on the grass at night and that they can be aggressive. Elephants, buffaloes, monkeys it was wildlife safari on Mount Kenya. What a great way to end this fantastic trip.

Larges trees with lichen, Mount Kenya 
Can you spot the elephant?
When to climb and hike
The dry period for the SE face of Nelion is January to February and Late August to September. Hiking is best from January to March and June to October. Expect ice and snow on Point Lenana year round
Do I need a guide?
You are not required to hire a guide to hike or climb on Mount Kenya. Park fees and campsites can be purchased at the park gates. Depending on the season, you may need to book campsites in advance.
Coming Next: Visiting a Maasai Village and a Safari in Maasai Mara
For extra pictures from Kenya click here. For pictures from other blogs go to Gallery at monkeystale.ca
To read about more of our adventures go to Destinations.
If you like what you read, please comment or share (with credit) using the links below.

Great, great photos!! As ever, a wonderful post that is a joy to read and enjoy! Stay Well!! 🙂
LikeLiked by 3 people
Thank you!!
LikeLiked by 1 person
Most welcome 🙂
LikeLiked by 1 person
It is indeed
LikeLiked by 2 people
Truly, another world. What a great adventure. Glad it all worked out for you. Thanks for sharing. Allan
LikeLiked by 4 people
Yes, it was so different from what we usually see in the mountains here. Thanks for reading! Maggie
LikeLiked by 1 person
Stunning! The trip as well as the captures.
LikeLiked by 2 people
Thank you! It’s an incredible area.
LikeLike
What an adventure this was for you. The sites you have seen! Magnificent!
LikeLiked by 2 people
This was one of the most interesting climbs we’ve ever had. Thanks for reading! Maggie
LikeLike
What I like most about your story is that your enthusiasm about the journey both up and down seems to far outweigh your disappointment of not making it to the final summit. The scenery really is extraordinary and so different from what I’ve seen elsewhere. The animals too—never seen/heard of the Skyes monkey (beauty). I’ve read lots of reviews of Kilimanjaro and not much about Mount Kenya so it was great getting to know this beautiful mountain. Wow, that alpenglow photo at the Austrian Hut is stunning.
LikeLiked by 3 people
Thanks Caroline, it was such an amazing trip that even with not summitting, we enjoyed every minute. We realized pretty early on that we wouldn’t climb, so we had to put that aside and enjoy the rest. Our climbing guide was a park ranger so for him to even do the first 2 pitches was pretty good, since they’re usually so rules based. Everything, except the actual climb, seemed to be perfect. Our guides and porters were excellent and so much fun, the huts were clean, the scenery was amazing and there was wildlife! We enjoyed this mountain much more than Kilimanjaro.
LikeLiked by 1 person
Great picture of you, Richard and your guide! 🌻
LikeLiked by 2 people
Thanks Stephanie, looking through these older trips, we used to take more pictures of ourselves! Maggie
LikeLiked by 1 person
Another exciting read with the journey to the top. The photos of the vegetation are amazing and it would be worth a hike in itself. Thanks for your time on sharing it.
LikeLiked by 2 people
Thank you, It’s definitely a great hike, and not too busy.
LikeLiked by 1 person
Nice to see pictures of you too. Great photos as usual.
LikeLiked by 2 people
hah, ya we don’t seem to take pictures of ourselves lately.
LikeLike
An amazing experience and equally amazing photos. What an adventure! Mel
LikeLiked by 2 people
Thanks Mel!!
LikeLiked by 1 person
Loved this for the photos. Brought back to mind a book I’d read last year: No Picnic on Mount Kenya by Felice Benuzzi, about escaping from a POW camp to go climb Mount Kenya
LikeLiked by 2 people
Oh wow, I’ll have to look for that book!
LikeLiked by 1 person
You guys have had some of the most amazing adventures. Much as we love a challenge I don’t think we could take on a rock climb like that! Must have been a fabulous experience. And as ever – stunning photography throughout the post.
LikeLiked by 3 people
Thank you, the hike is easy though, except for the altitude. It’s up there on our favourites list.
LikeLiked by 1 person
Stunning scenery and photos.
It’s amazing how different that African lobelia is than the little delicate US purple flowers.
LikeLiked by 3 people
I thought you’d like it. The lobelia on Mt Kenya is even different from Kilimanjaro!
LikeLiked by 1 person
Yes, I noticed that.
LikeLiked by 2 people
off the charts…how do you do it.
LikeLiked by 4 people
Haha, thanks. This was truly a surprise. We had no idea how incredible the scenery would be. Maggie
LikeLike
To me Mount Kenya looks even more appealing than Kilimanjaro. I noticed there are no other tourists in your photos — I guess it was a lot quieter there than in Africa’s tallest mountain? I’m still amused by those strange-looking plants you saw in both places. Those lobelias seem like they’re from another planet! Now I really really want to go.
LikeLiked by 4 people
You should go Bama. There were hardly any other hikers, and it’s much more beautiful than Kilimanjaro. Mackinder’s Camp had two other groups, but at our other camps we were alone. The plants are similar on both mountains. I think it’s because of the high elevation at the equator. The hike is the best part, no need to worry about the actual climbing summit.
LikeLiked by 1 person
While people like me can only dream of having adventures and experiences like this, we can at least live vicariously in your spirit through your vivid descriptions and awesome pictures. Thank you.
LikeLiked by 4 people
Thank you, I’m glad you shared our adventure! Maggie
LikeLike
I think those are some of the most scenic mountain pictures I’ve ever seen! The combination of the jagged peaks, the snow and the foliage are stunning. That hut is the icing on the cake! The views you had were also amazing with the gorge valley below. Ohhhh and then the alpenglow photos! I agree about living vicariously through your travels! Stay safe.
LikeLiked by 3 people
Thanks Linda, this is honestly one of the most picturesque mountains we’ve been on, and the scenery changed daily. Even the hike out was amazing. Glad you vicariously came along!! Maggie
LikeLiked by 1 person
So strange to see pictures of tropical plants with a snowy mountain peak directly behind it. Too bad about that climb – it looks like it would have been fun. (As usual, it always looks “fun” and “not that hard” while I’m standing in my kitchen looking at photos of it. If I were actually on it, I’d be pooping my pants in fear.)
LikeLiked by 3 people
Haha, I was pretty fearful too when the huge icicles were dropping all around us! Hiking at elevation on the equator has the most unusually wonderful landscapes, but this one has the best that we’ve seen.
LikeLiked by 1 person
I love these photos! So nice to see this stunning landscape and the wonderful plants. Pity the weather was against you completing the climb.
LikeLiked by 4 people
Thank you Helene, it’s an extraordinary place! Even without the climb it still ranks high on our favourite trips. Maggie
LikeLiked by 1 person
you guys are freaking AMAZING! Love the strange plant life, reminds me somewhat of the Simien Mountains.
LikeLiked by 2 people
Haha thanks! The plants are probably similar because I think Simiens are quite high too. We hope to go there someday.
LikeLike
This is amazing, the landscapes are interesting and the vegetations are even more interesting. You had a great adventure.
LikeLiked by 3 people
Yes it was a great trip. The landscape, plants and mountain views were much better than we had imagined.
LikeLiked by 2 people
Beautiful pics.
Mt Kenya is in my bucket list of events.
LikeLiked by 2 people
We loved Mount Kenya, it’s otherwordly beauty is spectacular.
LikeLike
You’ve done well to share all these adventures with us. Thank you so much😊
LikeLiked by 2 people
Thank you, glad you enjoyed them as much we as did having them 🙂
LikeLiked by 1 person
Hi Maggie,
Thank you for sharing your trips and tips with us.
A fellow Canadian hiker here (from Vancouver), and I have a question for you. How difficult was it to get off the plane fresh and hike up Mt. Kenya. We are doing the same thing, and I wonder if acclimatization would be tough going from sea level in Canada to Mt. Kenya at 4200 m in one day! Thank you.
LikeLiked by 1 person
You’re planning to get to Mackinders Hut in a day? Have you been to altitude before? We took 4 days to get to Point Lenana which was as high as we made it due to weather. It would be difficult to go faster than that. It think the first hut on the route we took was 3,000m, which is typically the elevation that people begin to have problems. We didn’t have any problems at all, but getting to 4,000m on your first day is a lot. We also don’t take Diamox. We met people who went much slower than us too. 4,000m in a day sounds very fast but the 4 day route we took was good. Howe that helps! Maggie
LikeLike
Thank you for the reply Maggie, very helpful. I was planning to get to the first Hut (~3000m) on the first day as I arrive in Nairobi in the early morning, and get to Mackinders on the 2nd day. from your reply though, it sounds best to stretch that. Thanks again for your help 🙂
LikeLiked by 1 person
If you have done well at altitude in the past you might be fine, but going slow is safer and ensures you can make it to the top. Good luck!
LikeLike