
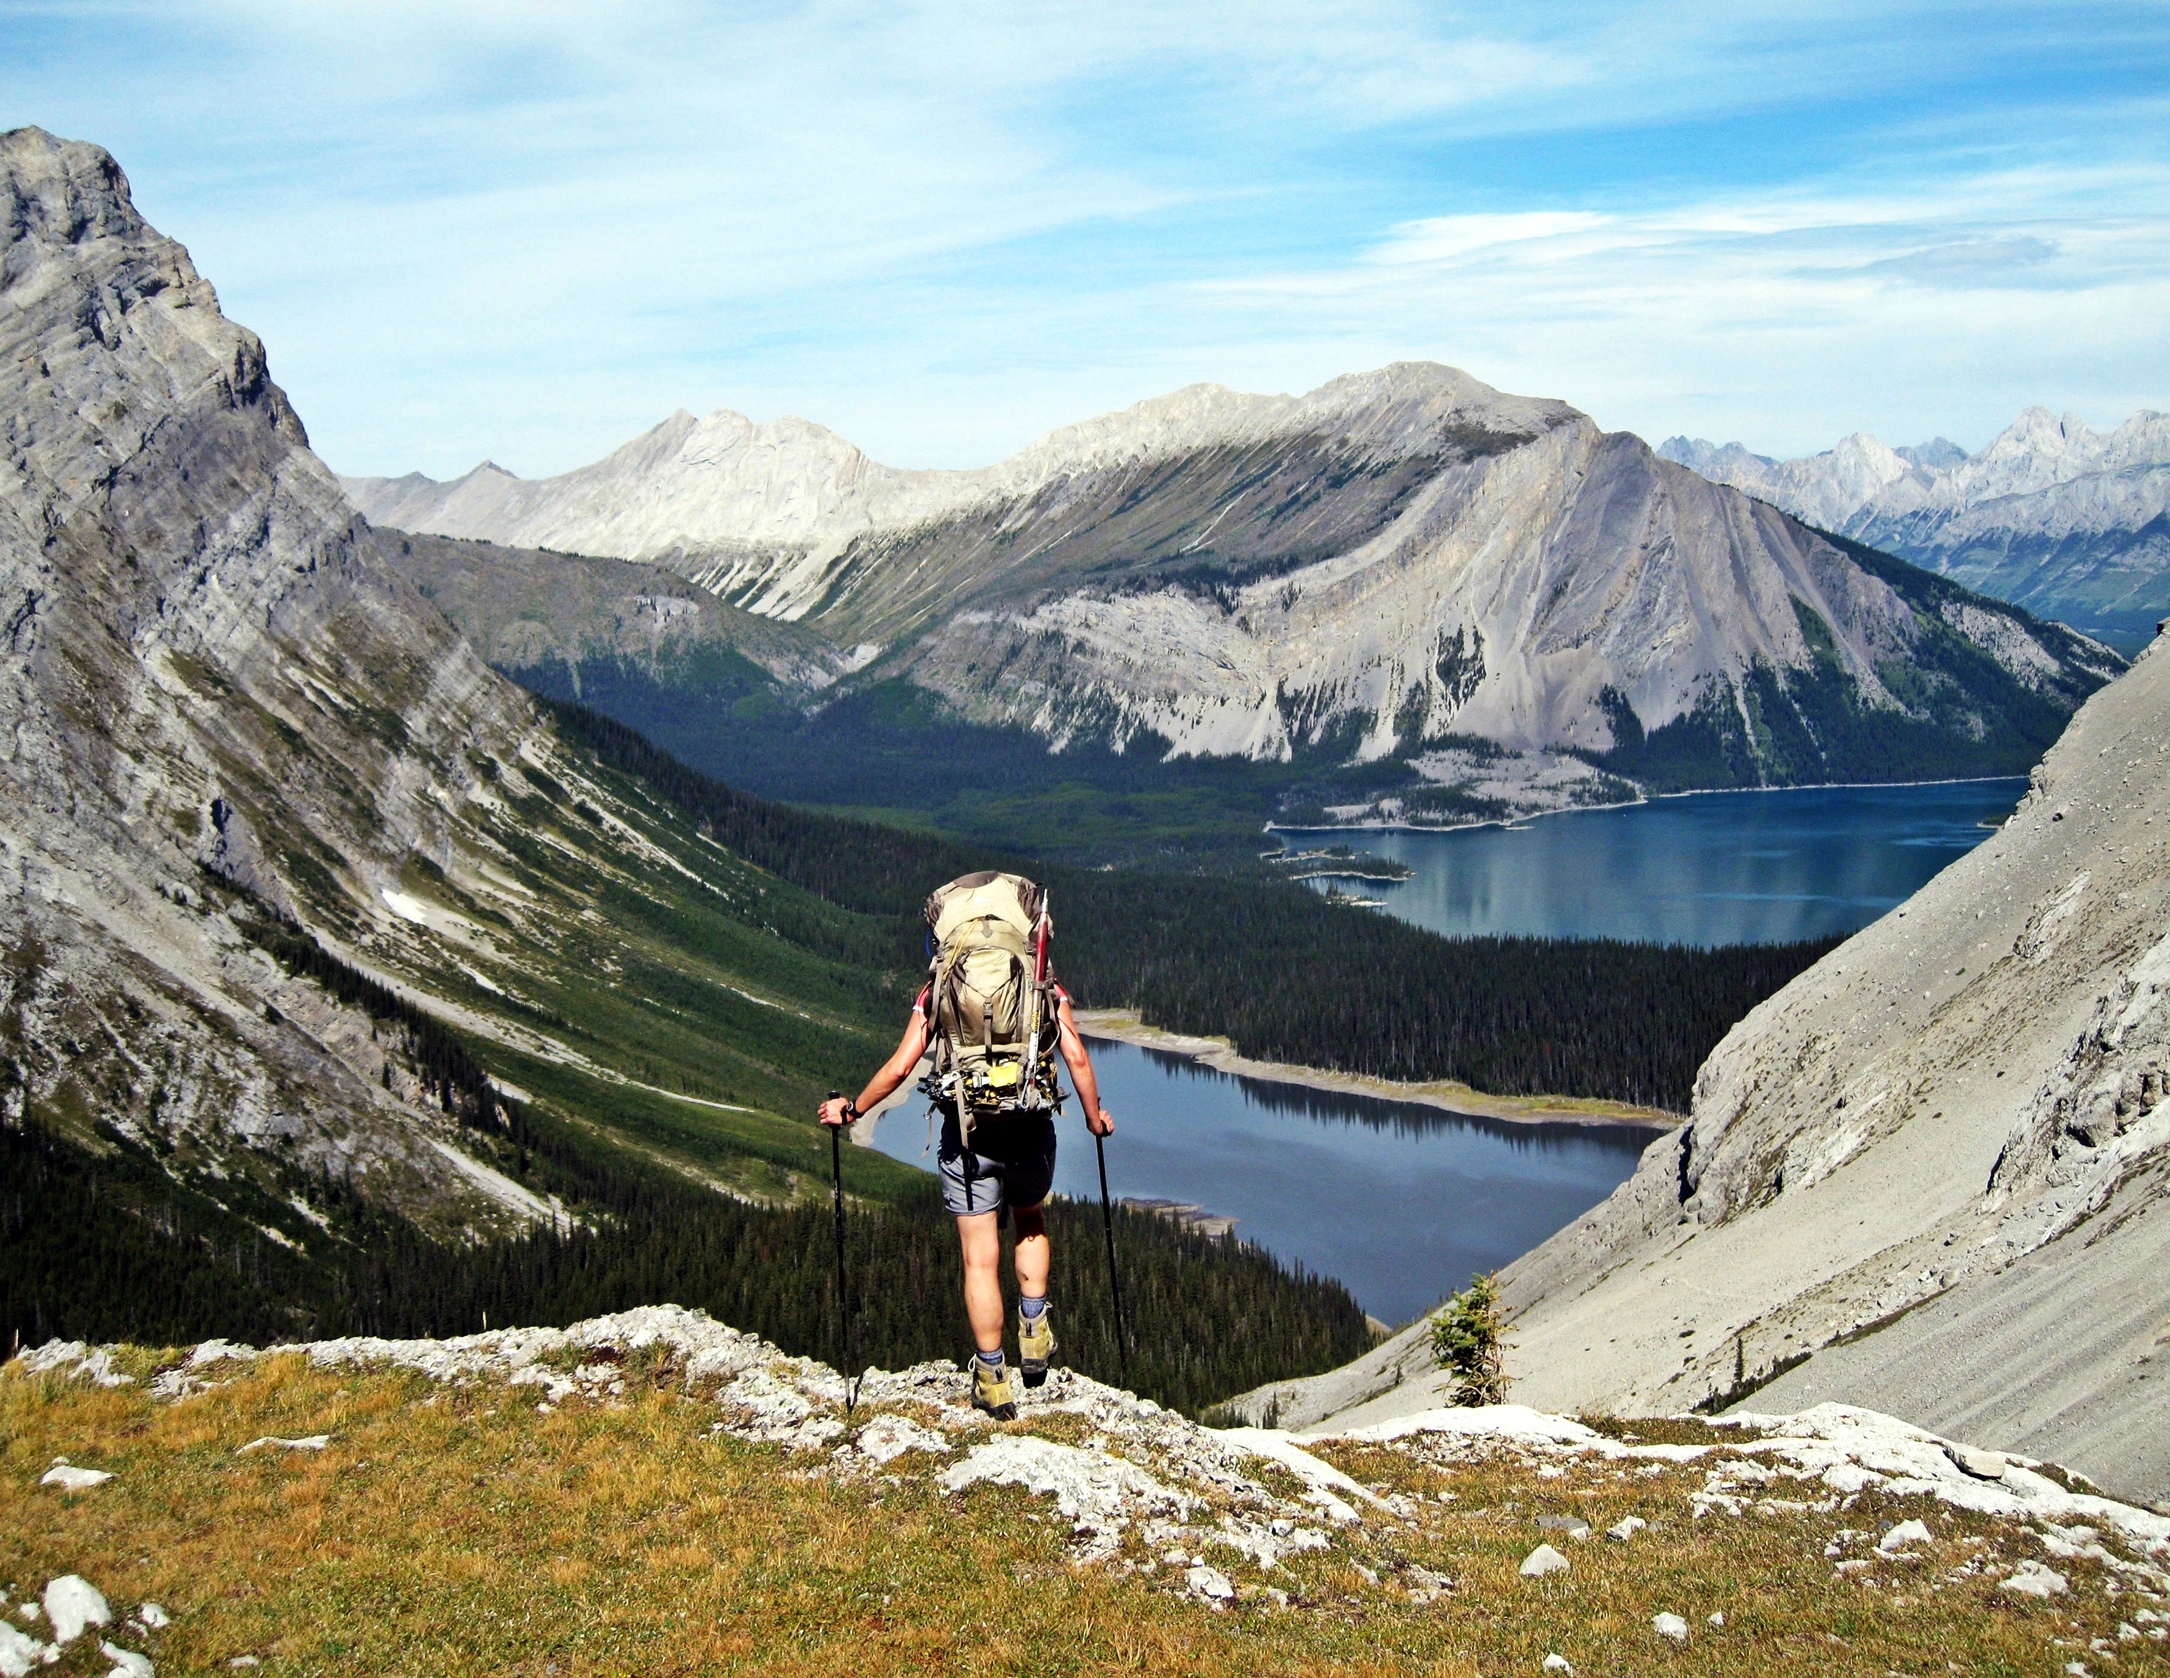
Looking for a multi-day backpacking trip in Kananaskis? There are many day hikes in Kananaskis Country that can be linked up to make an excellent multi-day trip in the Kananaskis backcountry. The hardest part is narrowing it down to the trip that’s best for you.
You can read about more hikes in Kananaskis in our post Top 10 Day Hikes From Calgary.
In this post we will describe different routes that you can connect together to make a great multi-day backpacking trip. Some of the routes we’re suggesting require technical experience and route finding skills, but we will also provide more straight forward alternatives. Each leg can be done in either direction.
The 5-day route we’re suggesting begins at Elk Pass and ends in Burstall Pass Parking Lot. If you don’t want to do this long trip you can enter or exit at trailheads for Aster Lake, Three Isle Lake, Turbine Canyon and/or Burstall Pass. (Click on the links to go directly to those trail options.)
We’ve hiked in this area several times and the pictures provided were taken on various backcountry trips over the years.
Stage I – Aster Lake
Day One – Elk Pass to Petain Basin
Distance – 17.9 km (11.1 miles)
Elevation Gain – 1,270 m (4,167 ft)
Access – Elk Pass Day Use Area, Peter Lougheed Provincial Park

The trail we’ll describe to Upper Elk Lake begins in Alberta, but there is a shorter approach from the BC side, north of Elkford. Park at the Elk Pass Day Use Area in Peter Lougheed Provincial Park. From the parking lot the trail slowly climbs through the trees to reach the AB-BC border at Elk Pass. For the rest of the day you’ll be hiking in BC’s Elk Lakes Provincial Park. From the pass follow the trail signs to Upper Elk Lakes. Most of the trail is in the trees but you do get glimpses of Lower Elk Lake through the forest. There is a backcountry campground at Lower Elk Lake if you need to make this a short day. Eventually you come into the open near Upper Elk Lake where you can see Petain Glacier and part of Petain Falls ahead.


To get to Petain Basin, continue on the trail beyond Upper Elk Lake. There is not much signage but there are often flagging tapes on the trees. The trail takes you through a flood zone so the route will change year to year. The turn off to Petain Basin is approximately 1 km before the falls. If you want a side trip to the waterfall, continue straight, but you do have to return to this turnoff to get to the basin. It’s possible to wild camp in this area if you don’t want to continue to Petain Basin on your first day.

The trail to Petain Basin is a very steep as it climbs the steep headwall. It is marked with a few cairns but route-finding skills are helpful. Approximately 500 m of elevation gain will bring to an open meadow that we found perfect for setting up our tent. There were quite a few grizzly digs in the area, but they seemed to be a few weeks old. They were a good reminder that we were in bear country.
When we arrived there was no one else around. That is until about an hour later when a lone hiker came and set up his tent a stone’s throw away from ours. He was mostly likely afraid of bears and felt more comfortable being close to us. He kept his headlamp on all night, as if that would offer him protection.


Note – Backcountry wilderness camping is permitted in the Petain Creek Valley and the Petain Basin. The campground that used to be in the basin is no longer there. Since it is wild camping there are no services so you must bring a rope to hang your food.
Day Two – Petain Basin to Aster Lake
Distance – 12 km (7.5 miles)
Elevation – 1,000 m (3,280 ft) Gain, 750 m (2,460 ft) Loss
Note – Aster Lake campground is closed for the 2023 season.
From Petain Basin meadow the route traverses around the cirque passing a few small glacier ponds to reach the toe of Petain Glacier. There’s no specific trail but it’s not difficult to navigate.
Petain Glacier is not a large glacier and is receding quickly, but it does have crevasses. You must be prepared for glacier traversing with ropes, harnesses and crampons. Carefully pick you way across the glacier to reach the col between Mount Joffe and Mount Petain. From the col you have a lovely view down the valley toward Aster Lake.


From the col, follow the small glacier that spills down the gully between Mount Joffe and Mount Petain to reach the valley bottom. There may be a lot water coming from the glacier making the valley below quite wet. Continue up the valley to reach the pretty Aster Lake.


Alternative Route to Aster Lake
Upper Kananaskis Lake to Aster Lake
Distance – 11 km (6.8 miles)
Elevation Gain – 580 m (1,902 ft)
Access – Upper Kananaskis Lake Day Use Area, Peter Lougheed Provincial Park
This is a more straightforward one-day approach to Aster Lake with no glacier crossing. The hike begins at Upper Kananaskis Lakes Day Use Area and travels almost halfway around the lake. The trail is flat and bordered by trees so is not scenic although you can see Upper Kananaskis Lake for most of the route. Near the halfway point watch for a small trail leading to Hidden Lake. When the water levels are low this small lake has a pebble beach that makes travelling around the lake quite enjoyable. When water levels are high however, you will have to bushwhack through the forest to get around the lake.
Above Hidden Lake the trail climbs a long scree slope. It’s not as bad as it looks because there is a good trail that slowly, but steadily gains elevation.


There is a lovely view of Fossil Falls across the valley that will distract you from the monotony of hiking up the scree. You can walk on unmarked trails to get closer to the falls if you like. You may even find fossils from the Mississippian age (about 340 million years old). You’ll need to return to the main trail though to reach Aster.

At the top of the scree slope, don’t forget to look back for an amazing view down towards Hidden and Upper Kananaskis Lakes. From there follow the trail as it works its way up the rock bands on the headwall of Mount Sarrail. If you’re lucky the open landscape at the top may be full of alpine flowers.
Follow Aster Creek to reach Aster Lake. The campground takes over a barren mound before the lake.
Note – This trail can be done in either direction to begin or end your hike on the Aster Lake trail.


Stage II – Three Isle Lake
Day Three – Aster Lake to Three Isle Lake via Northover Ridge
Distance – 10.5 km (6.5 miles)
Elevation Gain – 620 m (2,034 ft)

Although its only 10 km and 600 m elevation gain, the route always seems to be longer and higher than you expect. From Aster Lake Campground find the small trail that travels around Aster Lake. Once around the lake your general direction will be straight across the valley and up the gully beside Mt. Northover. Depending on the time of year, Aster Creek may be braided making it more tricky to navigate across the different streams. On the other side of the creek begin climbing the gully and soon you’ll be back in BC in Height of the Rockies Provincial Park. Some people will wild camp here instead of Aster Lake.
As the route climbs it passes two unnamed lakes. The first time we did this hike a freak storm came out of no where and we were pelted with hail. We dubbed these lakes ‘Hail Lake’ and ‘Hell Lake’. If the weather allows, enjoy the awesome views of Warrior Mountain and Mount Joffre.


From the top of this slope the trail traverses Northover Ridge, an undulating, narrow ridge trail that allows unmatched views toward South Kananaskis Pass. Some people describe it as a knife-edged ridge, but the trail is good, and unless there is snow and ice, it’s not difficult to traverse.
In the first picture below you can see the glacier between Mount Joffrey and Mount Petain from Day Two. At the end of the ridge there’s a quick run down the scree to reach the valley bottom. From there it’s a relatively straightforward walk to Three Isle Lake.
Note – This hike can be done in either direction.


Alternate Route – Upper Kananaskis Lake to Three Isle Lake
Distance – 11.9 km (7.4 miles)
Elevation Gain – 580 m (1,903 ft)
Access – North Interlakes Day Use Area, Peter Lougheed Provincial Park
If you want to begin or end your trip in Three Isle Lake, there is a well travelled trail between it and North Interlakes Day Use Area. You will spend a lot of time in the trees until you finally arrive at an open area where you can see the headwall below Three Isle Lake. Shortly after seeing this you reach The Forks Campground. It has a nice setting and is a great place to stop for lunch.


From the Forks, take the left trail toward Three Isle Lake. The climb becomes quite a bit steeper with countless switch backs until you reach the top of the headwall. The campground is not much further on the edge of Three Isle Lake.
Note – This hike can be done in either direction if you plan to begin or end your trip at Three Isle Lake.
Stage III – Turbine Canyon
Day Four – Three Isle Lake to Turbine Canyon via North and South Kananaskis Passes
Distance – 12.7 km (7.9 miles)
Elevation Gain – 655 m (2,149 ft)
From the campground walk around the north side of Three Isle Lake to its western tip. The trail then begins its climb up through the trees to South Kananaskis Pass and another Alberta/BC border. From the pass you have a nice view of Three Isle Lake below. After the pass, the trail goes into BC again through the corner of Height of the Rockies Provincial Park. Not far from the pass you reach Beatty Lake. There is a backcountry campground near the lake where some people will stay instead of staying at Three Isle Lake.

After Beatty Lake the trail rounds the west side of Mount Beatty crossing steep escarpments. The trail travels between bushes rather than trees so you have nice views toward Palliser Pass. A steep descent takes you to LeRoy Creek. There was quite a bit of damage in this area from the 2013 floods, some of which still hadn’t been repaired when we were there a few of years later. Look for cairns and flags for the best spot to cross the creek. You’ll then follow beside the creek for a while, but just before you start to climb, you have to cross the creek again.
The final approach to North Kananaskis Pass is a very steep, grunt of a hike. From the pass you have a gorgeous view of the mountains of The Royal Group on the other side of Palliser River. Continue on from the pass to find a good trail and a short hike down to the small but lovely Maude Lake.


Turbine Canyon Campground is not much further and has a fantastic setting along the side of a deep, narrow gorge formed by Maude Brook and a stream from Haig Glacier.
Note – This trail can be done in either direction.


Alternate Route – Kananaskis Lakes to Turbine Canyon
Distance – 11 km (6.8 miles)
Elevation Gain – 580 m (1,902 ft)
Access – North Interlakes Day Use Area, Peter Lougheed Provincial Park
If you want to begin or end in Turbine Canyon there is a straightforward approach from Upper Kananaskis Lake. The first 7.3 km of the hike is the same approach trail as for Three Isle Lakes. At the Forks Campground turn right and begin a steep climb up an avalanche slope and then continue to climb through the trees.
One hot summer day when we were hiking in this area we came across a huge grizzly who was cooling himself off in a small pond. We made noise letting him know we were there. He saw us but didn’t seem to care. The problem though, was that our trail went right beside his pond. Eventually the grizzly tired of our noise and ran off allowing us to pass by his pool. This was another solid reminder that we were in bear country, so we were especially careful with cooking and food storage that night.

Finally after a lot of climbing you’ll reach the picturesque Lawson Lake. After passing the lake, the trail eases up on its final approach to Turbine Campground.
Note – This can be done in either direction if you want to begin or end in Turbine Canyon


Stage IV – Burstall Pass parking via Haig Glacier
Day Five – Turbine Canyon to Burstall Parking Lot via Haig Glacier
Distance – Approximately 15 km (9.3 miles)
Elevation – 450 m (1,479 ft) Gain, 840 m (2,755 ft) Loss
This day will be the most challenging as it crosses two glaciers and travels on a rarely used trail through the trees. From the pretty Turbine Campground a good trail leads through the trees to reach Haig moraine. Follow the trail on the moraine that takes you to the huts of Beckie Scott High-Performance Training Centre. This is a summer training area for Canadian nordic ski teams. The marked trail continues for another 45 minutes from the huts to the glacier.
We’ve included a picture from Haig Glacier that Richard took in the late 80s. It was taken from a different spot, but by comparing the two pictures you can see how much it has receded.


Haig Glacier is relatively safe to travel on, but stay off the groomed ski tracks as you cross the glacier. Head toward the northwest end of the Haig to the col between Mount French and Mount Robertson. This is a popular ski touring area in the winter. In the summer you can see crevasses, but you should be able avoid them. You will need crampons and depending on conditions ropes and harnesses.


From the col it’s a long way down the glacier to reach the trees above French Creek. The trail then travels through the trees. It’s not often used in the summer so can be difficult to find at times. In addition there are two waterfalls that need to be navigated. Look for faint trails to help you find a way around them.
Not long after the second waterfall the trail follows old logging roads which are a welcome sight after all of the bushwhacking you’ve had to do through the forest. These take you all the way to Burstall Pass Parking lot. This route is not well travelled so map reading, route finding skills are needed.
Tips for backpacking in the Canadian Rockies
- Expect sudden changes in weather. Bring a rain jacket, an extra sweater, gloves and a toque for one-day or multi-day hikes.
- Hiking poles are useful in many areas and can help save your knees when going down steep descents.
- Water taken from streams will need to be treated, filtered or boiled.
- Fires are not allowed at most backcountry campsites so you will need to bring your own stove.
- Bring bear spray and/or bear bangers and educate yourself on wildlife safety.
- You will need to purchase a Kananaskis Conservation Pass.
- Campgrounds in Kananaskis can be booked here. Backcountry camping permits for Elk Lakes can be booked here.
For other hikes read Chester Creek – Headwall Lakes Circuit Trek, Mount Assiniboine, Top 10 Day Hikes from Calgary – Kananaskis or Banff, Rockwall Trek, Dolomite Peak
For extra pictures from Canada click here. For pictures from other blogs go to Gallery at monkeystale.ca
To read about more of our hikes click here. To read about Richard’s Seven Summits climbs click here.
To read our other travels in the world go to Destinations.
If you like what you read, please comment or share (with credit) using the links below.


We'd love to hear from you, please leave a comment.