

Looking for backcountry ski touring in the Rockies near Calgary? Sitting on the eastern slopes of the Canadian Rockies means that there are ample opportunities for backcountry ski touring in the area. Choosing where to go based on conditions and experience can sometimes be a difficult task. To help you make your decision on where to go, we’ve listed some of our favourite day ski tours in the Rockies near Calgary.
This list is intended for others who love ski touring in relatively safe terrain. This is not intended to be a guide since there are many available in books and online, but rather will give you an idea of the different routes and their scenery. Detailed information on specific routes should be researched further before heading out.
Remember to check conditions before travelling in the backcountry and stay up-to-date with avalanche training. Check avalanche conditions with Avalanche Canada.
You can go directly to Kananskis, Banff, Jasper, or the Kootenays.
Click on the image for an interactive map including details on parking.

Kananaskis
A Conservation Pass is required to stop in parks and public lands in Kananaskis and the Bow Valley. Passes can be purchased online here, or at Kananaskis Visitor Information Centres, or Canmore Nordic Centre.
Burstall Pass
Distance – 15 km return; Elevation – 470 m

The first part of the route to Burstall Pass travels to Burstall Lakes. This section is very popular with Nordic skiers, snowshoers and walkers, but once you get away from this busy area, you will be rewarded with a peaceful wilderness. On the flats above the headwall, you’ll pass under the large avalanche-prone slopes of Snow Peak, so find the safest route, which is usually through the trees on the far left side. From there, travel up a pretty drainage to the end, where it opens up and you can see the ski runs above. Most will continue up the trail toward Burstall Pass North, where you can ski a few laps on the nice open slopes.

Once you’re out of the trees, another other option is to continue the slow climb up the Burstall Pass South. The downhill is less stellar here, but the views are more spectacular.


The way out follows the same route with one exception. When there is sufficient snow, instead of taking the trail down the headwall, take the fun turns down the canyon beside it. At the bottom, though, it spits you out under the avalanche path of Mount Birdwood, so split up and move quickly. We have seen people snowshoe this route in reverse, which is not only dangerous for avalanches, but it also tears up the trail, making the ski descent much more tricky.
Note – After crossing under Snow Peak, do not take the summer trail that goes right to traverse below Burstall Pass. It travels through avalanche-prone areas and has been the site of deadly avalanches. In the picture below, you can see avalanche debris on this trail. The correct winter route takes the drainage as described above.

Access – Burstall Pass Day Use Area, Peter Lougheed Provincial Park
French and Robertson Glaciers
Access – Burstall Pass Day Use Area, Peter Lougheed Provincial Park
A. French Glacier
Distance – 14 km return; Elevation – 670 m
The trail to French Glacier begins in the busy Burstall Pass parking lot but quickly turns to follow the quiet French Creek drainage. It spends a lot of time in the trees, but there are still many rewarding views. At the end of the creek, you have a couple of options to reach the glacier, depending on avalanche conditions. Turning to the left to go up through the trees is safer than going straight through the canyon. Eventually, you will reach French Glacier. Ascending it is a slow and steady climb that feels never-ending. At the top, though, you’ll have stunning views from the Haig glacier.
You can return on the same route.


B. Robertson Glacier
Distance – 18 km return; Elevation – 1,000 m
The route to Robertson Glacier begins by following the Burstall Lakes trail, but at the end of the lake, turn left to follow the long valley to Robertson Glacier. Be aware of the avalanche chutes on both sides when travelling in this direction. From the top of Robertson Glacier, you can have either one of the best, mellow runs of the season or an awful day of survival skiing over cauliflower-like ridges on the wind-swept glacier.


C. French-Robertson Traverse
Distance – 20 km; Elevation – 1,000 m
If conditions are good, you can link these two and complete the French-Robertson Traverse (Also called French-Haig-Robertson Traverse). This is a very long day that takes you over two mountain passes and across three glaciers. The reward for this hard work is stunning views and a long, mellow ski descent. After skiing to the top of French Glacier (described above), head toward the Douglas-Robertson Col. Be prepared to turn around, though, as this area can have white-out conditions and high avalanche danger on the headwall. The top of the headwall puts you on Robertson Glacier for a quick ski down to Burstall Lakes. Once at the bottom, follow the trail back to the parking lot.
Although typically safe, be prepared with glacier travel gear.
For more details on the traverse visit our post Skiing The French Robertson Traverse

Chester Lake
Distance – 11 km return; Elevation – 310 m
Access – Burstall Pass Day Use Area, Peter Lougheed Provincial Park

The route to Chester Lake is a great workout and offers stunning views of the mountains around the lake. It is a safe option when conditions in the mountains are unstable. There are separate, well-marked ski and snowshoe routes that keep the two apart. The ski route is a slow, but steady climb through the trees to reach open meadows and Chester Lake below Mount Chester. Make note of where the steep climb ends so you will remember where to take your skins off on the return.

Once at the lake you can follow trails to Elephant Rocks and even higher to the valley behind where, when conditions are safe, you may be able to find a few turns on the Galatea Slopes. Even if you don’t want the turns, it is a long pretty valley that you can skin up for an extra workout.

The return route is the same and one you reach the highpoint in the trees, take off your skins for a quick descent back to the car.
Black Prince
Distance – 5 km return; Elevation – 350 m
Access – Black Prince Day Use Area, Peter Lougheed Provincial Park
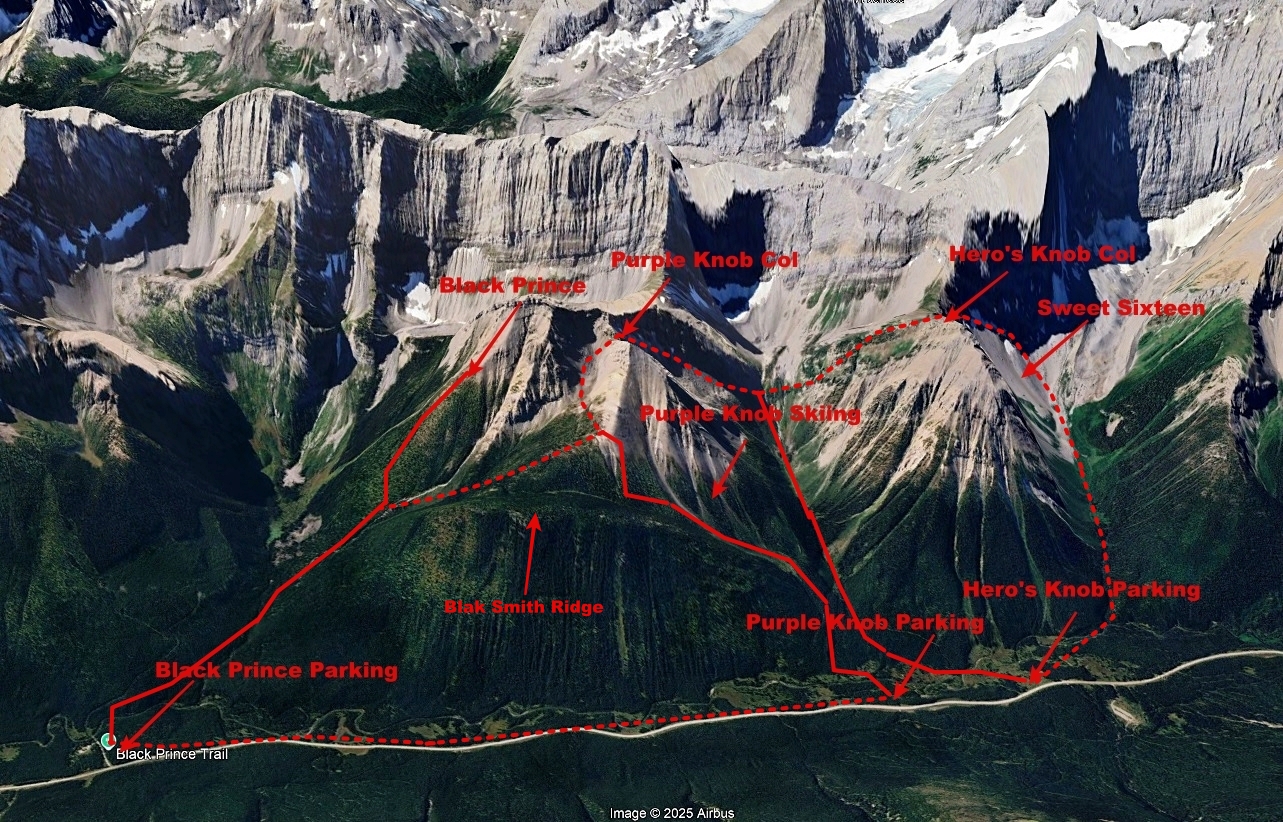
This is a local favourite with easy access to great downhill runs. From the parking lot, a good trail climbs up the creek before heading off into the trees to climb the ridge. The trail ends just above the tree line and offers a few downhill options based on conditions. The safest skiing is through the glades, parallel to the up-route. Many will stop partway down and do laps in this area. Note that the trees have grown in quite a lot over the years, so it’s not as open as it used to be. When conditions are very safe, you can descend the gully on skier’s right, but beware of avalanche danger and overhead hazards.


When conditions are good, some people will link Black Prince with Purple’s Knob. Another option is to detour left from the bottom of the slope to climb Black Smith Ridge, which runs parallel to the road. There can be decent tree skiing on the east side, but it is becoming quite dense lately.
Note – There have been avalanches on Black Prince even in the trees, so even though it is often considered a safe area, you still must be aware of conditions.
Purple Knob, Hero’s Knob Loops
These routes travel through three neighbouring valleys that drain into the Smith Dorrien-Spray Lakes Rd. All have easy access from the road, but their complex terrain means they should only be attempted by experienced parties in good conditions. You can link them up to create whatever length you want, depending on conditions. To make a very long day, you can even begin in Black Prince and end in Hero’s Knob.
A. Purple Knob
Distance – 4-5 km, Elevation – 600 m. For the Loop with Hero’s Knob – Distance – 7 km; Elevation – 620 m or 8 km 700 m
Access – Park on Smith Dorrien-Spray Lakes Road at the Purple Knob/Hero’s Knob Drainage approximately 2 km from the entrance to Sawmill Day Use Parking lot.
Purple Knob is the most southern of the three. The trail goes across the flat meadow next to the road, crosses Smith Dorrien Creek, and then moves left to climb up the benches above the creek. The trail can be icy or even bare, depending on conditions. After climbing the ridge, you’ll see a number of steep chutes. They are very popular ski descents when conditions are safe, but will be high risk for avalanches when conditions are not stable. There are a lot of downed trees in this area, indicating frequent avalanches, so skiing in this area should not be taken lightly. On a good day, though, the skiing is phenomenal with perfect pitches and gorgeous scenery.
If conditions are good, you can make it a loop by skiing up the col between Purple and Hero’s Knob South and skiing down the valley. Be aware that this loop crosses steep terrain and is exposed to avalanche risks in many areas.


Hero’s Knob
You can do both sides of Hero’s Knob, called south and north, or do both by skinning up Hero’s Knob South, crossing Hero’s Knob Col before skiing in Hero’s Knob North on the runs of Sweet 16. It’s usually done in this clockwise direction.
B. Hero’s Knob South
Distance – 5 km approximate; Hero’s Loop Distance – 8 km; Elevation – 650m
Access – Park on the Smith Dorrien–Spray Lakes Road at the open meadow around 1 km south of the Saw Mill parking lot entrance. If you’re doing the loop, park opposite the parking lot, not 1 km south.
Hero’s Knob South crosses the small meadow near the Smith-Dorrien Road and follows an old logging road before climbing through the trees in the valley between Mount Smith Dorrien and Black Prince. Eventually, you will reach an open cirque with a few chutes that can be skied. The terrain is very complex, so it should only be skied when conditions are safe. When conditions are good, though, it will likely be busy because of the near-perfect lines.


Near the end of the cirque, you can see the runs coming from Purple Knob Loop on the left. On the right is the complex route up the headwall to complete the Hero’s Knob Loop.

C. Hero’s Knob North
Distance – 4 km approx.
Access – Park on the Smith Dorrien–Spray Lakes Road across from the entrance to the Saw Mill parking lot.
This route travels through the drainage on the north side of Hero’s Knob. From the highway, cross Smith Dorrien Creek, and cut through the trees to reach a large open cirque. There are a few open slopes that can be attempted when conditions are safe, but this is complex terrain, so caution should be taken. If continuing up the cirque, travel quickly and pay attention to the slopes around. At the end of the cirque, you can see the slopes of Sweet 16, a very popular ski area when there’s fresh snow. The route coming from Hero’s Knob South skis down the Sweet 16 slopes.


Smuts Pass
Distance – 12 km return; Elevation – 600 m
Access – Park on the Smith Dorrien–Spray Lakes Road, 4 km from the Burstall Pass Parking Lot towards Canmore.

Cross the frozen flood plain beside the road and follow Commonwealth Creek all the way up the valley with gorgeous views of Mt. Smuts, Mt. Birdwood and The Fist. Remember to stay on the left (south) side of the valley to avoid avalanches coming down from The Fist. Once at the end of the valley, follow the creek through a narrow gap on the south until it opens up to expose a large avalanche gully on Mt. Birdwood. After crossing this, the route turns right (north) to travel through the forest. After 200m in the glades, take the first drainage to the west. Stay in the trees as long as you can until you can quickly ascend to the pass between these two peaks. This section of the trail is exposed and may be windblown, so do only when conditions are safe. Usually, the southern aspect of the pass is safer.
There are two options to return to your car. Either retrace your steps, or when conditions are excellent, link it up with Birdwood Pass and return on the Burstall Pass Trail. To do this, cross Birdwood Lakes and then head to the col between Mt. Birdwood and Mt. Smutwood. In unstable conditions, the slopes going down to Burstall can be hazardous and should not be attempted.
We haven’t taken many pictures of this option, but here are a couple of the pass and lakes from the summer.


Banff National Park
A park pass is required for stopping inside national parks. If you intend to make a few trips, it would be worthwhile to buy a Parks Canada Discovery Pass. They are valid at any national park across the country and can be purchased at most park entry gates.
Bow Glacier
Distance – 16 km return to hut; Elevation – 390 m to hut
Access – Bow Lake parking lot is situated on Icefields Parkway, between Lake Louise and Jasper.
This is a popular starting point for exploring the Wapta Icefields, but it can still make a great, if not long, day tour. Depending on how early in the season you are there, you will either ski across or around Bow Lake. The trail then travels through a pretty canyon. Early and late in the season, the creek may not be covered, making the trip more difficult. At the end of the canyon, climb out at the safest point, which changes depending on conditions. Once you’re above the canyon, you can see Bow Hut, high up on a cliff in the distance. After crossing the long moraine, carefully skin up the steep headwall. There can be high avalanche hazard in this area, so spread out and only go when conditions are safe.


Above Bow Hut, the glacier has nice mellow slopes at the perfect angle for fun turns and stunning mountain views. Although typically safe, be prepared with glacier travel gear.


If you don’t want to climb up to the glacier, you can ski the glades on the side of Mount Crowfoot, just before the moraine. They often provide great powder skiing.
For more details go to our post Wapta Traverse – A Classic Ski Tour
Peyto Glacier
Distance – 20 km return to hut; Elevation – 550 m to hut
Access – The easiest approach is by parking in a small pullout located 1.7 km north of the Peyto Lookout turnoff. It is marked on the map.
The route to Peyto Glacier passes through complex terrain and under avalanche hazards. It is a long approach, so if you make it a day trip, it will be a full day. After skiing down to the lake and moving across it, you will reach a canyon. The safest option is to climb the slope on the right to travel above the canyon. From there, ski to the end of the valley before climbing up the moraine to reach Peyto Glacier. The hut is still higher on a slope above. For a day trip, ski to the small hill toward Bow Hut for a few good turns before returning the way you came.


For more details go to our post Wapta Traverse – A Classic Ski Tour
Skoki
To Deception Pass – Distance – 11 km , Elevation – 750 m gain; plus to Skoki Lodge – Distance – 3.5 km, Elevation – 320m loss/gain
Access – The turn off for Fish Creek Parking Lot is off Whitehorn Rd. before Lake Louise Ski Resort.
This is a long day, but it provides amazing views of Mount Temple and other peaks in the area. Unless you want to buy a lift ticket, you’ll have to ski up the long ski-out from Fish Creek Parking lot to Temple Lodge. From there, follow the trail up through the trees up to an open meadow below Mt Redoubt. Then, you’ll slowly gain elevation to reach Boulder Pass. This spot provides gorgeous views behind you toward Mt. Temple.
From the pass, it’s a long, flat ski across the frozen Ptarmigan Lake to reach the headwall of Deception Pass. Once at the top of the pass, take your skins off and enjoy a mellow ski down through the trees for a 320 m descent to the lodge. But if you’re not staying overnight, you’ll have to climb all the way back up to Deception Pass (320 m gain). The return follows the same route.


Sunshine Meadows
Distance from Sunshine Village – 3-5 km; Elevation – 136 m
Access – Sunshine Village Ski Resort Parking Lot. There is limited parking so it’s best to arrive early.
To reach Sunshine Village, either skin up the ski-out trail (5km) or pay for a one-way trip on the gondola. If you skin up, expect Sunshine Ski Patrol to remind you several times that you can not use their lifts.
From the top of Standish or Strawberry Chairlifts, skin up to reach the top of the resort. Sunshine Meadows (2,300m) is a large, open area with expansive views of the Rocky Mountains and is outside of the resort boundary. The rolling hills of the meadows offer gorgeous views, including Mt Howard Douglas and Citadel Peak. You can roam around the meadows, enjoying the views, ski to Rock Isle Lake or go for turns on Sunshine Landing. You will also travel across this meadow on the Sunshine to Mt. Assiniboine Traverse. You can read more about that trip here.


Boom Lake
Distance – 16 km return; Elevation – 175 m
Access – Boom Lake Day Use Lot on Highway 93, 6 km from Castle Junction.
This is an easy trail that, after a short climb, takes you through the trees to reach the lake. It is popular with hikers, so expect the trail to be busy. Once you reach the lake, you can see chutes around the edge that could be skied when conditions are safe. There’s also an ice climbing area at the far end of the lake.
If conditions are good, the trail to Kindergarten Couloir can be reached by leaving the trail 500 m or so before the lake. It is a committing, tight run but is very popular.


Moraine Lake
Distance – 15.5 km return; Elevation – 250 m
Access – In the winter, there is a small parking lot on Moraine Lake Road near its intersection with Lake Louise Drive.
For an easy day with amazing views, ski up the Moraine Lake Road. It is often track-set for Nordic skiing, but you can travel between the tracks all the way to a viewpoint at the end. It’s not difficult, but it is a good workout for days when avalanche risk is high and offers views of Mt. Temple and the Valley of the Ten Peaks.


Jasper National Park
Saskatchewan Glacier
Distance – 15 km to Castleguard Meadows; Elevation – 590 m
Access – From the Big Bend parking lot on Icefields Parkway.
As a part of the Columbia Icefields, Saskatchewan is a large, open glacier offering spectacular views. It has relatively easy access and is less crevassed compared to Athabasca, further up the highway. Depending on the year, it’s usually best to wait until late March or April when there is sufficient snow coverage on the glacier.
From the parking lot, cross the washout, and then follow the old road through the trees to reach the glacier. This area may either be snow-covered or have an exposed moraine. There is good skiing on Castleguard Meadows, which is one of the first peaks you’ll see. Another option is to climb Mt. Castleguard, but you will need to spend a night or two on the glacier. You must be prepared with glacier travel gear and experience.


Kootenay National Park
Stanley Glacier
Distance – 10 km return; Elevation – 365 m
Access – Stanley Glacier Trailhead, Kootenay National Park, 5 km west of the Alberta/BC border.
A relatively short day that takes you under the impressive cliffs of Mount Stanley in Kootenay National Park. After crossing the bridge, a series of switchbacks climbs the headwall to take you to the start of Mount Stanley Cirque. It is a stunning scene with multiple frozen waterfalls dropping off its sheer wall. You can continue to travel on the relatively flat ground in the cirque, but keep an eye on the avalanche hazards on both sides of the cirque. It’s not a difficult ski, but the rewards are great. There are a few open slopes near the end of the cirque for skiing when conditions are safe.
Don’t forget to look back for stunning views of the Kootenays, up and down the highway.


Storm Mountain – After crossing the bridge, the left route takes you to an old fire road to Storm Mountain. Today, though it is mostly overgrown and it is not an enjoyable route.
Prospector’s Valley
Distance – 24 km return; Elevation – 600 m
Access – The trailhead is at the Marble Canyon parking lot, on Highway 93 South, 6.5 km west of Castle Junction.
This trail used to be very popular before Fay Hut burned, but it is still a good, long day of skiing and can get you up to gorgeous scenery. The first 10 km travels along undulating terrain along the creek, passing many large drainages. On the fourth drainage, the trail begins its ascent up the hill to reach a rock band. At an obvious notch, remove your skis to scale the rock band. There is likely a rope to help, but since the hut is closed, it may not be in good condition. Once above the rock band, continue skiing higher to reach the open plateau where the hut was located.


If you are interested in climbing and hiking in Greece, visit our friend Thomas’ website, Olympus Mountaineering. They provide valuable information and detailed guides for many trad and sport climbing, mountaineering and hiking routes in Greece. You can find their website here.

For information on other ski tours read our posts Skiing The French Robertson Traverse, Wapta Traverse – A Classic Ski Tour; Ski Traverse To Mount Assiniboine.
To read more of our adventures in Canada, click here. Or to see our other hikes and bikes in Canada and around the world, go to Trek-Bike-Ski.
Coming Next – Top Sites To Visit In Yerevan, Armenia
For pictures from other blogs go to Gallery at monkeystale.ca
To read about more of our adventures go to Destinations.
If you like what you read, please comment or share (with credit) using the links below.


We'd love to hear from you, please leave a comment.